![[React 컴포넌트] 댓글 기능 구현하기](https://img1.daumcdn.net/thumb/R750x0/?scode=mtistory2&fname=https%3A%2F%2Fblog.kakaocdn.net%2Fdn%2FbdbjbO%2FbtrIsSkrL8w%2Fj8GvGnB37KK5LEz5pI8yl1%2Fimg.png)
구상
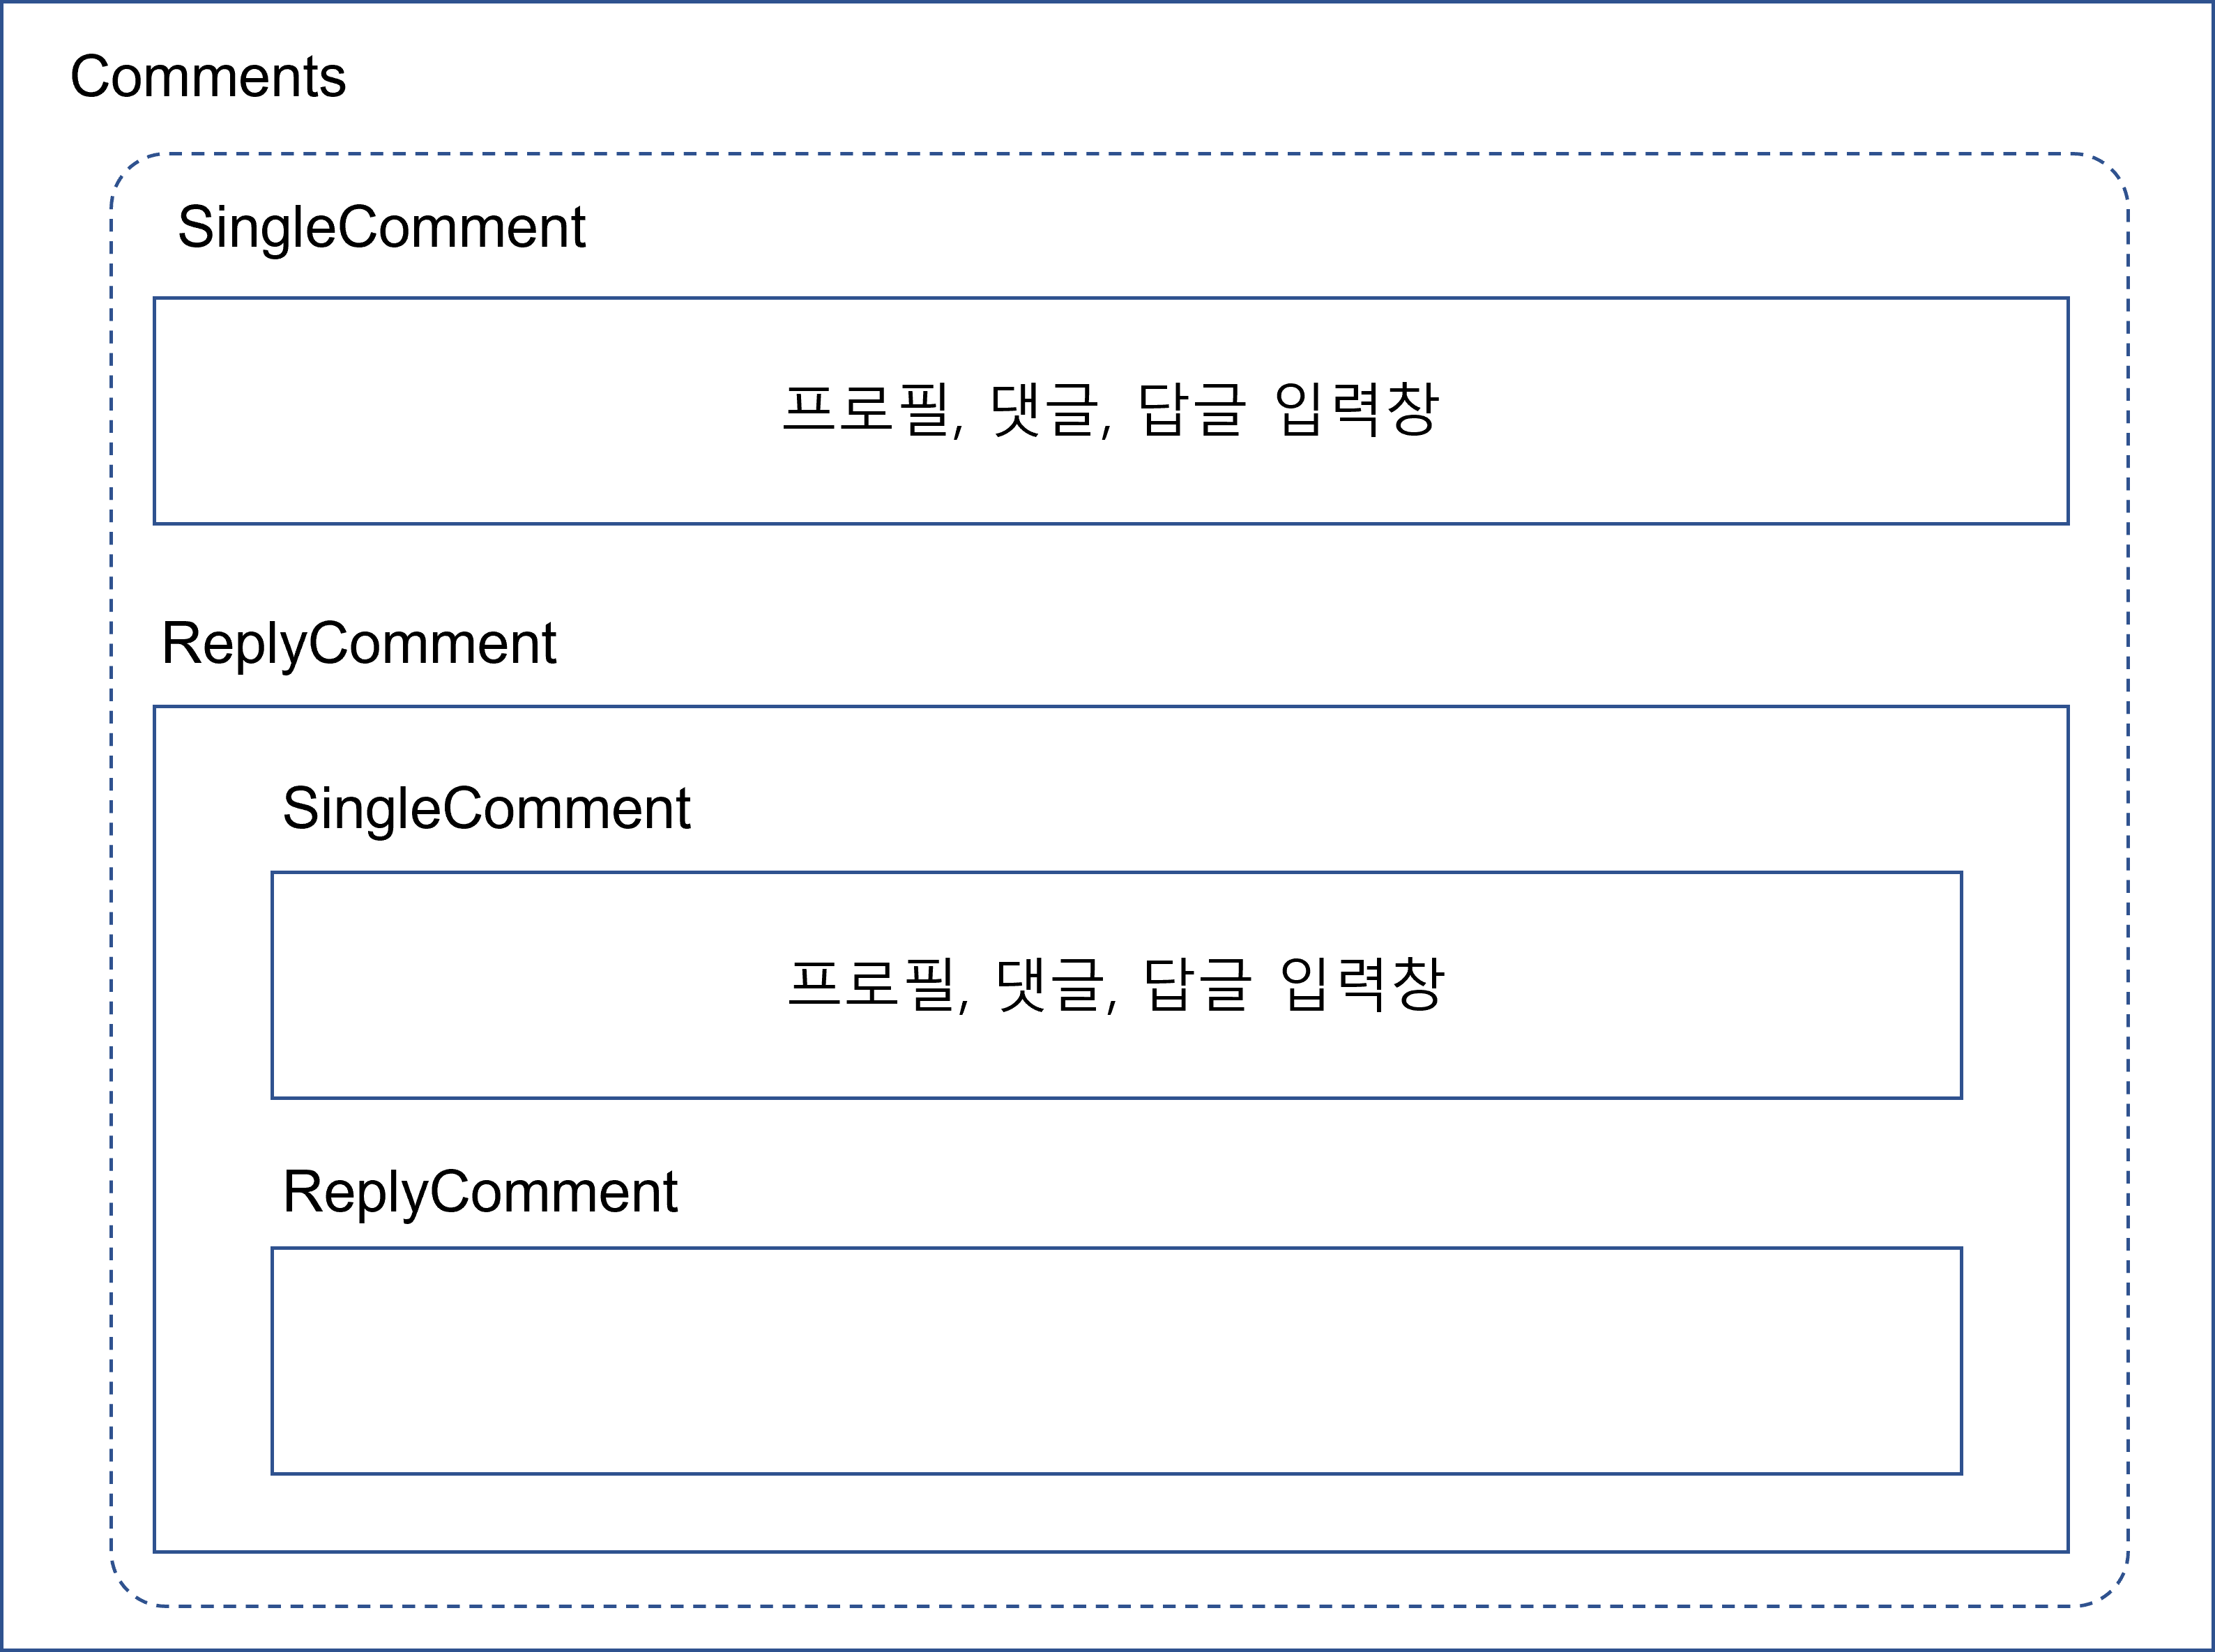
댓글과 관련된 구역을 Comments 컴포넌트를 만들어서 관리할 것이다. 댓글 기능이 필요한 모든 페이지에 Comments 컴포넌트를 넣으면 된다. Comments.js의 하위 컴포넌트 구성은 다음과 같다.
- Comments.js
- 댓글 입력창 (textarea, submit 버튼), 그 아래에는
- map()으로 SingleComment + ReplyComment의 묶음을 렌더링한다.
- SingleComment는 댓글 아이템 (프로필, 이름, 내용, 좋아요 버튼 등을 가짐)에 해당하고 토글하면 답글 입력창이 나온다.
- ReplyComment는 댓글 아이템 (SingleComment)과 ReplyComment를 하위 구성요소로 갖는다. 일종의 재귀적 구성으로 그 아래에 계속 ReplyComment가 달릴 수 있다.
- 만약 답글을 1depth로 제한하고 싶으면 ReplyComment가 재귀적이지 않게 만들면 된다. ReplyComment 컴포넌트가 들여쓰기 효과를 주고 답글 입력창을 없앤 SingleComment만 구성요소로 갖도록 하자.
React
Comments 컴포넌트
포스트에 대한 댓글을 작성할 textArea와 submit 버튼, SingleComment(댓글 조각)과 그 댓글에 대한 답글 리스트(ReplyComment)를 갖고 있는 부분이다. 댓글 기능을 추가할 상위 페이지에서 props로 commentLists를 내려주면 여기에서 SingleComment와 ReplyComment 쌍을 map()으로 보여준다.
이때, responseTo가 존재하지 않는 것만 화면에 보여준다. 그러면 reply가 아닌 포스트에 대한 댓글만 맨 위에 보여지게 된다. reply는 ReplyComment 컴포넌트가 렌더링해줄 것이다.
onSubmit에서는 Redux의 로그인 정보를 확인해 로그인한 사용자만 댓글을 작성할 수 있게 한다. 이와 같은 조치는 SingleComment에서 reply를 작성하는 부분에도 똑같이 적용한다.
props.refreshComments는 상위 페이지에서 자신의 CommentLists에 새로 작성한 코멘트를 추가할 수 있도록 다음과 같은 함수를 내려준 것이다. 상태 끌어올리기를 위한 함수라고 할 수 있다. 이를 Comments에서 /saveComment 요청을 보내거나 SingleComment의 reply 작성에서 /saveComment를 할 때 props.refreshComments(새로 작성한 댓글정보)와 같이 실행하면 된다.
const refreshComments = (newComment) => { setCommentLists(CommentLists.concat(newComment)); };
import React, { useState } from 'react';
import axios from 'axios';
import { useSelector } from 'react-redux';
import { Button, Input } from 'antd';
import SingleComment from './SingleComment';
import ReplyComment from './ReplyComment';


const { TextArea } = Input;

function Comments(props) {
  const user = useSelector(state => state.user);
  const postId = props.postId;

  const [CommentValue, setCommentValue] = useState("");

  const onChangeHandler = (event) => {
    setCommentValue(event.currentTarget.value);
  };

  const onSubmit = (event) => {
    event.preventDefault();

    if(user.userData && !user.userData.isAuth) {
      return alert('로그인을 해주세요');
    }

    const variables = {
      content: CommentValue,
      writer: user.userData._id,
      postId: postId
    };

    axios.post('/api/comment/saveComment', variables)
      .then(response => {
        if(response.data.success) {
          setCommentValue("");
          props.refreshComments(response.data.result);
        } else {
          alert('댓글을 저장하지 못했습니다.');
        }
      });
  };

  return (
    <div>
      <br />
      <hr />
      <p>Replies</p>

      {/* Root Comment Form */}
      <form style={{ display: 'flex' }} onSubmit={onSubmit} >
        <TextArea
            style={{ width: '100%', borderRadius: '5px' }}
            onChange={onChangeHandler}
            value={CommentValue}
            placeholder="댓글을 남겨주세요"
        />
        <br />
        <Button style={{ width: '20%', height: '52px' }} onClick={onSubmit} >Submit</Button>
      </form>
      <br />
      {/* Comment Lists */}
      {props.commentLists && props.commentLists.map((comment, index) => (
        (!comment.responseTo &&
          <>
          <SingleComment refreshComments={props.refreshComments} comment={comment} postId={postId} />
          <ReplyComment commentLists={props.commentLists} refreshComments={props.refreshComments} parentCommentId={comment._id} />
          </>
        )

      ))}
    </div>
  )
}

export default Comments
SingleComment 컴포넌트
댓글 한 조각에 해당하는 컴포넌트이다. 해당 댓글에 대한 답글 작성 폼(textarea, submit 버튼)을 가지고 있고, 답글 입력 폼은 클릭과 state를 통해 open 여부를 결정할 수 있다.
import React, { useState } from 'react';
import axios from 'axios';
import { useSelector } from 'react-redux';
import { Comment, Avatar, Button, Input } from 'antd';
import LikeDislikes from './LikeDislikes';

const { TextArea } = Input;

function SingleComment(props) {
  const user = useSelector(state => state.user);

  const [OpenReply, setOpenReply] = useState(false);
  const [CommentValue, setCommentValue] = useState("");

  const onClickReplyOpen = () => {
    setOpenReply(!OpenReply);
  };

  const onChangeHandler = (event) => {
    setCommentValue(event.currentTarget.value);
  };

  const onSubmit = (event) => {
    event.preventDefault();

    if(user.userData && !user.userData.isAuth) {
      return alert('로그인을 해주세요');
    }

    const variables = {
      content: CommentValue,
      writer: user.userData._id,
      postId: props.comment.postId,
      responseTo: props.comment._id // 답글을 달 댓글의 원 주인의 _id
    };

    axios.post('/api/comment/saveComment', variables)
      .then(response => {
        if(response.data.success) {
          setCommentValue("");
          setOpenReply(false);
          props.refreshComments(response.data.result);
        } else {
          alert('댓글을 저장하지 못했습니다.');
        }
      });
  };

  const actions = [
    <LikeDislikes userId={localStorage.getItem('userID')} commentId={props.comment._id} />,
    <span onClick={onClickReplyOpen} key="comment-basic-reply-to">Reply to</span>
  ];

  return (
    <div>
      <Comment
        actions={actions}
        author={props.comment.writer.name}
        avatar={<Avatar src={props.comment.writer.image} alt />}
        content={<p>{props.comment.content}</p>}
      />

      {OpenReply &&
        <form style={{ display: 'flex' }} onSubmit={onSubmit} >
          <TextArea
              style={{ width: '100%', borderRadius: '5px' }}
              onChange={onChangeHandler}
              value={CommentValue}
              placeholder="댓글을 남겨주세요"
          />
          <br />
          <Button style={{ width: '20%', height: '52px' }} onClick={onSubmit} >Submit</Button>
        </form>
      }
    </div>
  )
}

export default SingleComment
ReplyComment 컴포넌트
댓글에 대한 reply를 렌더링하는 부분이다. map()을 통해 props.parentCommentId와 responseTo가 일치한 것만 화면에 보여준다.
import React, { useState, useEffect } from 'react'
import SingleComment from './SingleComment';

function ReplyComment(props) {

  const [ChildCommentNumber, setChildCommentNumber] = useState(0);
  const [OpenReplyComment, setOpenReplyComment] = useState(false);

  useEffect(() => {
    let commentNumber = 0;

    props.commentLists.forEach((comment) => {
      if(comment.responseTo === props.parentCommentId) {
        commentNumber++;
      }
    });

    setChildCommentNumber(commentNumber);
  }, [props.commentLists, props.parentCommentId]);

  const renderReplyComment = (parentCommentId) => props.commentLists.map((comment, index) => (
      <>
      { parentCommentId === comment.responseTo &&
        <div style={{ width: '80%', marginLeft: '40px' }}>
          <SingleComment comment={comment} refreshComments={props.refreshComments} />
          <ReplyComment commentLists={props.commentLists} refreshComments={props.refreshComments} parentCommentId={comment._id} />
        </div>
      }
      </>
    )
  );


  const onClickHandler = () => {
    setOpenReplyComment(!OpenReplyComment);
  };

  return (
    <div>
      {ChildCommentNumber > 0 &&
        <p onClick={onClickHandler}>
          View {ChildCommentNumber} more comment(s)
        </p>
      }
      {OpenReplyComment &&
        renderReplyComment(props.parentCommentId)
      }
    </div>
  )
}

export default ReplyComment
API
model (models/Comment.js)
작성자(writer), 게시글 아이디(postId), responseTo(답글 대상), 내용(content)가 있다. responseTo 필드가 존재한다면 답글이라는 의미이므로 답글용 모델을 따로 준비하지 않아도 된다.
const mongoose = require('mongoose');
const Schema = mongoose.Schema;

const commentSchema = mongoose.Schema({
  writer: {
    type: Schema.Types.ObjectId,
    ref: 'User'
  },
  postId: {
    type: Schema.Types.ObjectId,
    ref: 'Post'
  },
  responseTo: {
    type: Schema.Types.ObjectId,
    ref: 'User'
  },
  content: {
    type: String,
  }
}, { timestamps: true });

const Comment = mongoose.model('Comment', commentSchema);
module.exports = { Comment };
router (router/comment.js)
const express = require('express');
const router = express.Router();
const { Comment } = require('../models/Comment');
const { auth } = require('../middleware/auth');

router.post('/saveComment', auth, (req, res) => {
  const comment = new Comment(req.body);

  comment.save((err, comment) => {
    if(err) return res.json({ success: false, err });

    Comment.find({ '_id': comment._id })
      .populate('writer')
      .exec((err, result) => {
        if(err) return res.json({ success: false, err });
        res.status(200).json({ success: true, result: result });
      });
  });
});

router.post('/getComments', (req, res) => {
  Comment.find({ 'postId': req.body.postId })
    .populate('writer')
    .exec((err, comments) => {
      if(err) return res.status(400).send(err);
      res.status(200).json({ success: true, comments });
    });
});

module.exports = router;'UI 구현 연구일지' 카테고리의 다른 글
| [React] Debounce(디바운스) 적용한 검색어 자동완성 구현기 (2) - 검색어 키보드로 선택하기 (0) | 2023.06.14 |
|---|---|
| [React] Debounce(디바운스) 적용한 검색어 자동완성 구현기 (1) (0) | 2023.06.14 |
| [React 컴포넌트] Like, Dislike (좋아요, 싫어요) 기능 만드는 법 (0) | 2022.07.11 |
| [React 컴포넌트] Favorite(찜, 좋아요) 버튼 만드는 법 (0) | 2022.07.11 |
| [React 컴포넌트] 더 보기(Load More) 버튼 만드는 법 (0) | 2022.07.08 |